DIY Custom Glass Cups!

Love these DIY ideas as much as we do? Stay up to date on our latest findings by liking our facebook page at Home and Heart DIY Facebook!

Wow, this is amazing! Who knew you could cut glass without any special tools. This is why I love the DIY world, there’s so many cool things you can do that you would never think of on your own. This particular DIY may require a bit more caution than our regular post but still looks pretty doable!

corona_cups1

The basic idea is you wrap yarn or twine around a bottle many times to get a nice solid loop. Then dip the twine in nail polish remover and place back on the bottle.

corona_cups

Light the twine, twist a slow rotation until the fire goes out then immediately plunge into a sink of cold water and Bam! Your bottle is now a cup. With a little sanding of the rim you’ll be ready to go.

There are a few safety concerns, so before trying this DIY make sure to check out the step by step instructions here- Drinking Made Easy

4 Awesome Colored Hair Styles!

Love these DIY ideas as much as we do? Stay up to date on our latest findings by liking our facebook page at Home and Heart DIY Facebook!

I’m seeing these beautiful bright vibrant Ombre hair colors more and more these days. It’s crazy what we are able to do with color now. I don’t think I’d be bold enough to go for a look like this but I do think they’re gorgeous!

hair3

hair2

hair1

hair4

(image sources: We Heart It)

4 Summer Shirt Cut Out Ideas

Love these DIY ideas as much as we do? Stay up to date on our latest findings by liking our facebook page at Home and Heart DIY Facebook!

It’s so easy to get sick of the clothes in the closet! It seems like lately, I’m trying on 9 different outfits before I feel I can leave the house! (I hate it when that happens…).

Here are four easy DIY’s to spruce up the clothes you’ve already got without spending any money!

1. The Backless Tee

This is definitely the most simple of the four. Take an old tshirt, and cut a narrow triangle section out of the back. (CAUTION: don’t cut too high up, unless you don’t want to be able to wear a bra!) Tie the two ends you’ve just created together and there you go!

Backless

2. The Striped Back Tee

On the back of a tshirt, begin cutting slits about two to three inches apart. Leave at least three inches on the bottom. After you’ve cut your slits, cut the hemline off of the bottom of the shirt. Proceed to cut that into two and half to three inch sections. You’ll use those fabric pieces to wrap around the sections of the tee you cut. You can throw a stitch or two in there to secure the piece, or (like me) you can use a dab of hot glue.

Cut out stripes

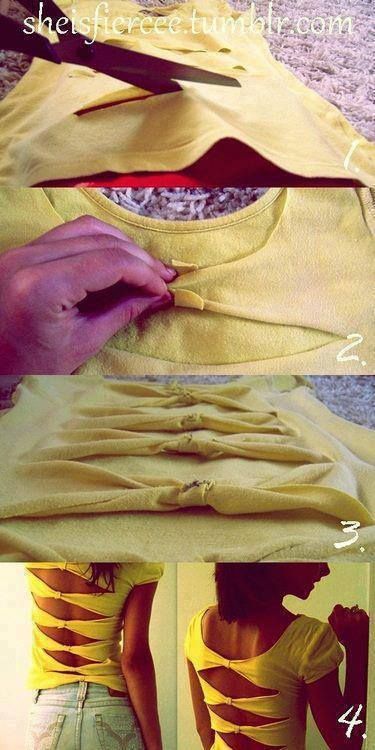
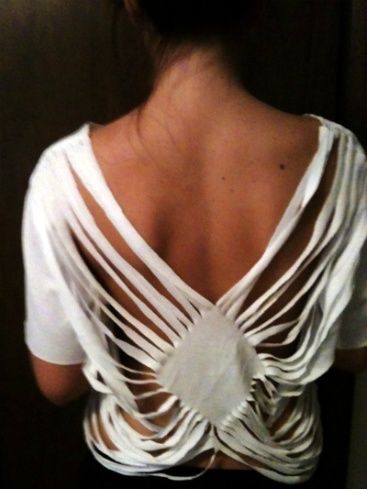
3. The Diamond Back Tee

This looks much more complicated than it actually is. The most important part is marking off the sections you don’t want to cut. Trace a diamond shape on the center of the back of a tshirt (you can do just about any shape you’d like here!). The mark a one to two inch border around the back of the shirt. Again, this is where we’ll stop cutting, so it’s really up to you where you want this to be. Take a pair of scissors and begin cutting narrow strips in between the diamond shape and border. Do this all the way around the shirt.
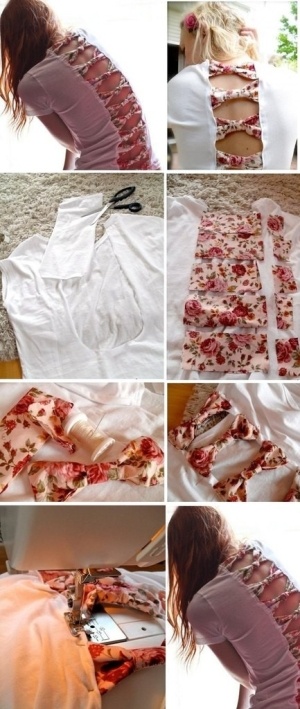
Diamond Cut Out

4. The Bow Back Tee

This DIY does require some sewing. It’s a more complicated version of the striped back tee. Use a scrap fabric you’ve got lying around that  you like. Cut it into three by five inch strips. (The amount of these you cut will depend on how far down the shirt you want to go). Cut the same amount of one by two inch strips. Next, cut a section out of the back of the tshirt. I’d make sure it was no more than six inches wide and no less than four inches. Head to the sewing machine! Sew in the bigger sections on each side of the section you cut out. After you’re finished with that, take the smaller fabric pieces, wrap it around the center of the bigger fabric pieces, creating the bow shape. Throw a stitch or two in there to secure the middle piece (or use hot glue again!)

Bows

Happy DIY-ing!

(Sources: Pinterest)

DIY Chrysanthemum Mirror- from Plastic Spoons!

Love these DIY ideas as much as we do? Stay up to date on our latest findings by liking our facebook page at Home and Heart DIY Facebook!

Now this is a DIY that will really impress all you crafty types out there. Using the most basic materials to make this beautiful Chrysanthemum Mirror!

chrysanthemum-mirror2

Regular store bought plastic spoons…
chrysanthemum-mirror-1

Patterned in order like so…
chrysanthemum-mirror-5

Painted…
chrysanthemum-mirror-8

And Bam! This gorgeous Chrysanthemum Mirror!
chrysanthemum-mirror-13

Pretty amazing! Check out the original post at Addicted 2 Decorating for the full step by step instructions. Happy DIYing!

DIY Light Box!

Love these DIY ideas as much as we do? Stay up to date on our latest findings by liking our facebook page at Home and Heart DIY Facebook!

I have been wanting to do something like this light box for a while. Upon inspection this actually looks pretty doable!

night-light-on

This simple 2×2 frame allows for a single lightbulb to light up the box over stretched canvas.

night-light-backing

Super cute idea and I can’t wait to try it! For the full tutorial check out- The Design Sponge

Cracked & Calloused Feet Remedy

Love these DIY ideas as much as we do? Stay up to date on our latest findings by liking our facebook page at Home and Heart DIY Facebook!

My feet can get pretty bad, especially in the summer time! This is a great tip that I’d never seen before but I’ve seen over and over again on the internet. I’m definitely going to give it a try!

Mix 1/4 c Listerine (any kind), 1/4 c vinegar and 1/2 c of warm water. Soak your feet for 10 minutes. Remove your feet, and wipe off the dead skin with a dry towel.

Listerine Feet

Source: Beauty Darling

Knotted Ponytail

Love these DIY ideas as much as we do? Stay up to date on our latest findings by liking our facebook page at Home and Heart DIY Facebook!

New spins on old standby’s are absolutely alright in my book! This spin on the ponytail is great for dirty hair days, bad hair days, and regular ole’ hair days! It looks more complicated than it is.

Separate the hair into two sections. Tie hair in a knot.Repeat once or twice (it’s all up to you!). Pin it in place and you’re done! Cute and easy!

Knotted Pony Tail

(Via Refinery 29)

DIY Cabinet Rope Light!

Love these DIY ideas as much as we do? Stay up to date on our latest findings by liking our facebook page at Home and Heart DIY Facebook!

Love this idea! You can line under the edge of you cabinets to conceal the rope light and let the light spill out from under the edge.

rope-light

Rope light is easy to find at your local hardware store and usually will look something like this out of the packaging…
rope-lighting-1

Depending on your electrical setup it may be neccessary for you to drill a hole in your cabinets to run the power cord to an outlet in a discreet way. Happy DIYing!

(picture source unknown)