DIY Studded T-Shirt

Love these DIY ideas as much as we do? Stay up to date on our latest findings by liking our facebook page at Home and Heart DIY Facebook!

I need to spruce up my wardrobe! I want something new and shinny for fall! A DIY Studded T-Shirt can brighten up any old shirt or transform a plain shirt from the store to something fabulous!
DIY Studded T-Shirt


DIY Studded T-Shirt
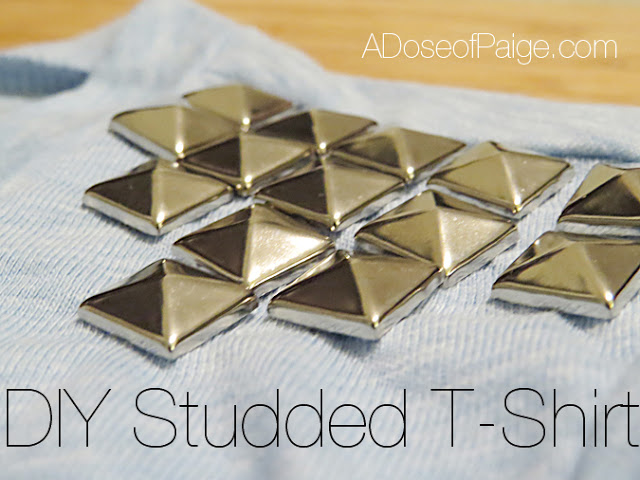
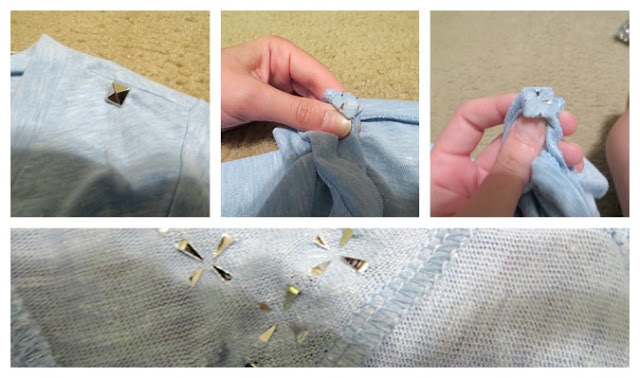
Only a few things are needed and it will only cost a few dollars! Those are the best DIY projects. You need studs, which can be found online or at a craft/fabric store. Also, gather up some fabric glue and whatever shirt you decide to decorate. I love to decorate! Get super creative with where to put the studs and how to decorate your shirt! Once you have your design, poke the studs through the shirt and fold the edges down (this keeps you from getting poked). Fabric glue helps be sure the studs are on there good and tight! For the full tutorial and all the details, follow the link to- A Dose of Paige

DIY Wax Paper Luminaire

Love these DIY ideas as much as we do? Stay up to date on our latest findings by liking our facebook page at Home and Heart DIY Facebook!

You know when you have tons of money for decorating? Me neither! I get to create amazing ideas on my own and this is such a great one! DIY Wax Paper Luminaires are beautiful, easy, and you will love them!
DIY Wax Paper Luminaire


DIY Wax Paper Luminaire

Don’t think you have to be crafty to get amazing results with this one! You need some pressed flowers/greenery or anything else you think would look nice in your lantern. The basic things you will need are lots of wax paper, ruler, an iron, towel, craft knife, and tape.  The amazing tutorial will show you how to press the flowers in-between sheets of wax paper and then shape the paper into lanterns. Love at first sight! We have a great tutorial thanks to the guys at-A Practical Wedding

Tuck and Cover Hair

Love these DIY ideas as much as we do? Stay up to date on our latest findings by liking our facebook page at Home and Heart DIY Facebook!

I love headbands! Up hair and headbands are my go-to’s for quick and easy hair! I love this twist on the regular old headband routine. Check out this Tuck and Cover Hair!
Tuck and Cover Hair

Grab two headbands, one pretty and one plain stretchy, and some hairspray and you are ready for this easy up-do. It is too cute! Follow the link for this fab look!-My Soul is the Sky

DIY Kool-Aid Lip Stain

Love these DIY ideas as much as we do? Stay up to date on our latest findings by liking our facebook page at Home and Heart DIY Facebook!

Kool-aid isn’t really a fall beverage. It does make a really terrific lip stain perfect for any season! Waste not, want not-use up that old Kool-aid and you will end with the most gorgeous DIY Lip Stain!

DIY Kool-Aid Lip Stain

The most difficult step in this DIY is deciding on the color of your Kool-aid! You can mix and match to get the perfect hue or stick with the packaged flavors. Cherry will get you orange red, tropical punch ends up bright red, and pink lemonade is barbie pink. Peach mango will be a nice and peachy, Strawberry Kiwi ends is a pretty light red, and grape is a light shade of purple! Once your color is picked, all you need to do is dampen your finger or lick your lips and press a coat of the powder on. Rub it completely over your lips and then go back with a Q-tip to smooth out any uneven spots or clumps. Wow! Check out the Kool DIY Lip Stain- The Beauty Department 

DIY Clementine All Natural Cleaner

Love these DIY ideas as much as we do? Stay up to date on our latest findings by liking our facebook page at Home and Heart DIY Facebook!

I hate cleaning my house! Lately I feel like I am channeling my inner Cinderella all day long! Somebody has to do it. I am always looking for new and better cleaners to get the job done. I am really liking DIY Clementine All Natural Cleaner!
DIY Clementine All Natural Cleaner

What else would be in an all natural cleaner other than vinegar? You will need 4 clementines, distilled white vinegar, and a jar with a lid. Peel the clementines and eat them (I guess you could throw them away). Put the peels in the jar and cover with vinegar. This cleaner is great but isn’t an overnight-er. It needs to marinate for at least 10 days and up to 30 (be sure to shake it every once in a while). When your mix is ready, use 2 parts water and 1 part clementine solution. Now you are ready clean! Check out the link for DIY Clementine All Natural Cleaner-The Mama’s Girls

DIY Poem Script Scarf

Love these DIY ideas as much as we do? Stay up to date on our latest findings by liking our facebook page at Home and Heart DIY Facebook!

Sometimes the cutest things cost so much money! It isn’t fair! Just because you can’t buy them doesn’t mean you can’t have them! There is always a DIY option. I love love love this DIY Poem Script Scarf!

DIY Poem Script Scarf

DIY Poem Script Scarf

I love this! Such a beautiful scarf and just in time for the blustery weather! Run out and grab a scarf and some TeeJuice Markers (fabric markers) and you are minutes away from adding something amazing to your wardrobe! That really is all you need. That and some prose or lines that make you swoon. Before you start, lay something down so your markers don’t bleed through. Also, be sure to practice a few words on cardboard or scratch paper before you get going on your “pashmina.” When you are done, let it dry completely and then iron with a cloth over it to make the ink permanent. Easy, yes?! Thanks Stamp 48 –Follow the link for the DIY Poem Script Scarf!

How to Wear Red Lipstick

Love these DIY ideas as much as we do? Stay up to date on our latest findings by liking our facebook page at Home and Heart DIY Facebook!

Bright lips terrify me! I am a fan of gloss and chap-stick but the thought of bright bright bright lipstick can be a little intimidating! I fear having it smudged and all over my teeth. What if it looks out of place on my face?! Finally a DIY on How to Wear Red Lipstick the right way!

How to Wear Red Lipstick


How to Wear Red Lipstick

I am starting small and working my way up to ruby red lips! You want to be bold and own this look but if you aren’t there yet, it’s no shame. I’m not ready yet either! Start with a soft color or a lip balm underneath to tone down your color and when your ready go for a bolder color and ditch the balm. When you are ready to go big, its all about the prep work to be sure your lips keep rockin your new red lipstick. To learn all about Exfoliating, powdering, lining, priming-check out the How to Wear Red Lipstick tutorial at Beauty High

Fix Crumbling Makeup

Love these DIY ideas as much as we do? Stay up to date on our latest findings by liking our facebook page at Home and Heart DIY Facebook!

Butterfingers! I rush about in the mornings and things fly around like crazy! It couldn’t be more sad when my makeup compacts and eye shadow  fall and shatter into a billion pieces. Now there is a way to salvage abused makeup! Fix Crumbling Makeup all on your own!

Fix Crumbling Makeup


I keep my makeup around as long as I can, it’s like a competition with myself to see how long it will last! So breaking it is devastating! Now there is a way to salvage the broken pieces of our foundation. You need the original container the makeup was in, rubbing alcohol, and  something to stir with. First crush up the already broken makeup even more (into a powder) and add the alcohol. You want a smooth spreadable consistency (peanut butter-ish). Smooth out your mix in the original compact and let it dry overnight. It won’t look like it’s new from the store, but it will work like it is! Follow the link to see how Fixing Crumbling Makeup has been tested and tried and passed!-The Craft Patch